Amazon Elastic Kubernetes Service (EKS)
Overview
This guide will demonstrate how to install Ondat onto a Amazon EKS cluster using either the Ondat kubectl plugin or Helm Chart.
Prerequisites
1 - Cluster and Node Prerequisites
The minimum cluster requirements for a non-production installation of Ondat are as follows:
- Linux with a 64-bit architecture.
- 2 vCPU and 4GB of RAM per node.
- 3 worker nodes in the cluster and sufficient Role-Based Access Control (RBAC) permissions to deploy and manage applications in the cluster.
- Ondat works with Ubuntu, Bottlerocket or Amazon Linux 2/2022 (11th November 2022 release with Kernel 5.4.219-126.411.amzn2.x86_64 or above) Linux distributions.
- For more information on the Linux distributions that are supported, and how to update Amazon Linux with the correct Kernal Modules, see System Configuration.
For a comprehensive list of prerequisites and how to build a production installation of Ondat please refer to Ondat Prerequisites
2 - Client Tools Prerequisites
The following CLI utilities are installed on your local machine and available in your $PATH:
Ondat can be installed either via Helm Chart or using our command-line tool. Depending on which installation method you choose you will require either:
3 - Creating a cluster with the correct Linux distribution
In this example, we have used eksctl to create a cluster with 3 nodes of size i3en.xlarge running Ubuntu for EKS in the eu-west-2 region. We have provided 20 GB of disk space for each node. With a default installation Ondat will store data locally in the node’s file system under the path /var/lib/storageos on each node in hyperconverged mode. In a production infrastructure, we would create multiple Elastic Block Store (EBS) Volumes tweaked for performance or use ephemeral SSD storage and mount our volumes under data device directories with some additions to user data. We would also implement some form of snapshots or backup of these underlying volumes to ensure continuity in a disaster scenario.
3a - Creating the cluster.yaml file
Create the following cluster.yaml file that will be used to create your cluster. Make the following updates:
- The file to use the
regionandavailabilityZonesthat you need - The
<key-name>field in the publicKeyName parameter - make sure you update this to match your ssh key name.
# cluster.yaml
---
apiVersion: eksctl.io/v1alpha5
kind: ClusterConfig

metadata:
  name: ondat-cluster
  region: eu-west-2
  version: "1.22"

addons:
  - name: aws-ebs-csi-driver

iam:
  withOIDC: true

managedNodeGroups:
  - name: ondat-ng-2a
    availabilityZones:
      - eu-west-2a
    minSize: 1
    maxSize: 3
    desiredCapacity: 1
    instanceType: i3en.xlarge
    amiFamily: Ubuntu2004
    ssh:
      allow: true
      publicKeyName: <key-name>
    labels: {ondat: node}
    volumeSize: 20
    volumeType: gp3
    volumeEncrypted: true
    disableIMDSv1: true
    iam:
      withAddonPolicies:
        ebs: true
    preBootstrapCommands:
      - mkdir -p /var/lib/storageos
      - echo "/dev/nvme1n1 /var/lib/storageos ext4 defaults,discard 0 1" >> /etc/fstab
      - mkfs.ext4 /dev/nvme1n1
      - mount /var/lib/storageos

  - name: ondat-ng-2b
    availabilityZones:
      - eu-west-2b
    minSize: 1
    maxSize: 3
    desiredCapacity: 1
    instanceType: i3en.xlarge
    amiFamily: Ubuntu2004
    ssh:
      allow: true
      publicKeyName: <key-name>
    labels: {ondat: node}
    volumeSize: 20
    volumeType: gp3
    volumeEncrypted: true
    disableIMDSv1: true
    iam:
      withAddonPolicies:
        ebs: true
    preBootstrapCommands:
      - mkdir -p /var/lib/storageos
      - echo "/dev/nvme1n1 /var/lib/storageos ext4 defaults,discard 0 1" >> /etc/fstab
      - mkfs.ext4 /dev/nvme1n1
      - mount /var/lib/storageos

  - name: ondat-ng-2c
    availabilityZones:
      - eu-west-2c
    minSize: 1
    maxSize: 3
    desiredCapacity: 1
    instanceType: i3en.xlarge
    amiFamily: Ubuntu2004
    ssh:
      allow: true
      publicKeyName: <key-name>
    labels: {ondat: node}
    volumeSize: 20
    volumeType: gp3
    volumeEncrypted: true
    disableIMDSv1: true
    iam:
      withAddonPolicies:
        ebs: true
    preBootstrapCommands:
      - mkdir -p /var/lib/storageos
      - echo "/dev/nvme1n1 /var/lib/storageos ext4 defaults,discard 0 1" >> /etc/fstab
      - mkfs.ext4 /dev/nvme1n1
      - mount /var/lib/storageos
3b - Creating the cluster
Once you have created the yaml file above, run the following eksctl command to create your cluster.
eksctl create cluster --config-file=cluster.yaml
⚠️ With the above configuration, volumes will be deleted when the nodes they are attached to are terminated. Be sure to keep snapshots, for example by using Data Lifecycle Manager.
4 - Connecting to your cluster
First, provision your kubeconfig for kubectl and test that you can connect to Kubernetes. You will need to update the script with the region where your cluster is.
export AWS_REGION="eu-west-2" # Insert your preferred region here
aws eks update-kubeconfig --region AWS_REGION --name ondat-cluster
kubectl get nodes
If you receive the message No resources found or see nodes marked as NotReady, wait for 2-3 minutes in order for your nodes to transition to Ready and check again to ensure they are running before proceeding through the next steps.
5 - Creating a StorageClass for etcd to use
If you used the eksctl cluster configuration defined above, the gp3 storage class is already available so you can skip to the next step. Otherwise you can set up the EBS CSI Driver as follows:
It is important to note that the Ondat etcd usage of disk depends on the size of the Kubernetes cluster. However, it is recommended that the disks have at least 800 IOPS at any point in time. The best cost-effective storage class that fulfils such requirements is gp3. If gp2 is used, it is paramount to use a volume bigger than 256Gi as it will have enough IOPS even when the burstable credits are exhausted.
To use a gp3 storage class in Kubernetes it is required to install the Amazon CSI Driver. Follow [this guide] (https://docs.aws.amazon.com/eks/latest/userguide/ebs-csi.html) to install. Follow the steps below:
- Create IAM permissions
- Install the CSI driver
- Using EKS addon
- Using self-managed add on (AWS clusters, but not in EKS)
- Install the
gp3StorageClass:
kubectl create -f - <<EOF
kind: StorageClass
apiVersion: storage.k8s.io/v1
metadata:
  name: gp3
allowVolumeExpansion: true
provisioner: ebs.csi.aws.com
volumeBindingMode: WaitForFirstConsumer
parameters:
  type: gp3
EOF
Installation of Ondat
Step 1 - Adding a Cluster
The Ondat Portal is how you can license and get the commands for installing Ondat:
- Either login or create an account on the Ondat Portal
- Choose the ‘Install Ondat on your cluster’ or ‘Add cluster’ options the UI
- Add a Name for your cluster and where it is going to be located
Step 2 - Choosing the Installation Method
You can use either the kubectl-storageos CLI or Helm 3 CLI to install Ondat onto your cluster. The most common way is to use Helm due to its popularity in the Kubernetes community, but both are fully supported and described below
Step 3a - Installing via Helm
The Ondat Portal UI will display the following cmd that can be used to install Ondat using Helm. The command created will be unique for you and the screenshot below is just for reference.
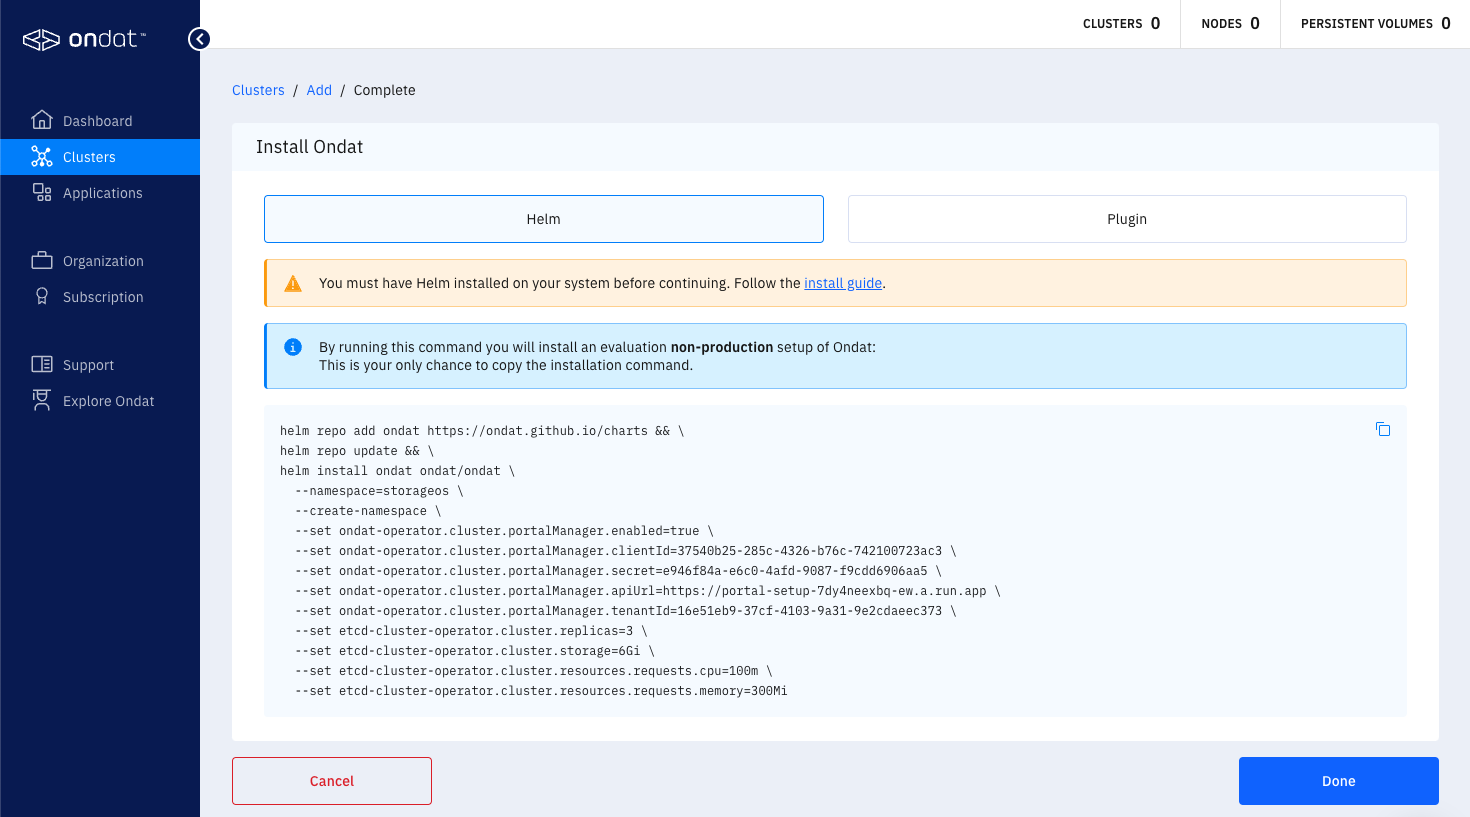
The first two lines of the command adds the Ondat Helm repository and ensures a updated local cache. The remaining command installs Ondat via Helm with a set of basic install parameters that are sufficient for a basic trial installation and to connect the Ondat installation with your portal account for licensing. The installation process may take a few minutes. The end of this guide contains information on verifying the installation and licensing.
Step 3b - Installing via kubectl-storageos plugin
The Ondat Portal UI will display the following cmd that can be used to install Ondat using the kubectl-storageos plugin. The command created will be unique for you and the screenshot below is just for reference.
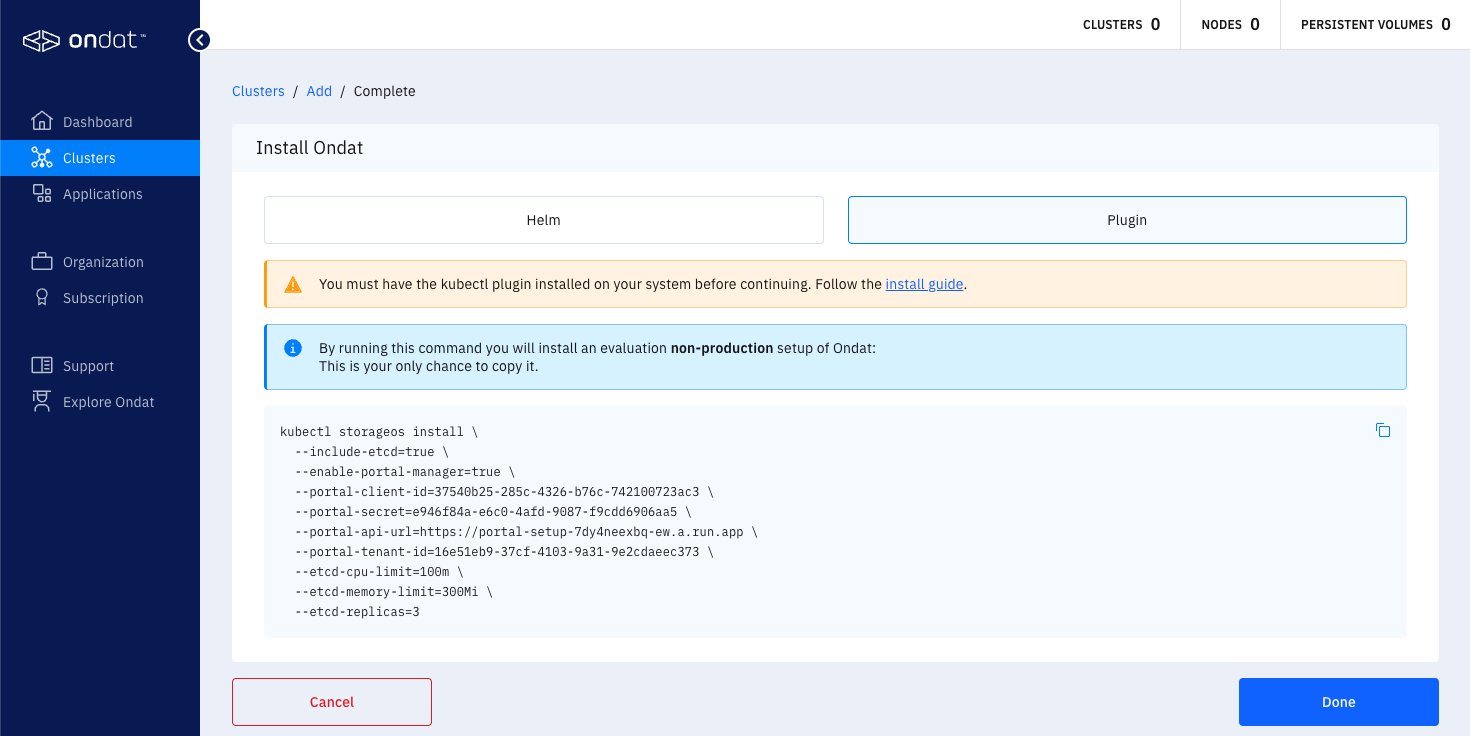
The command that is provided by the Portal is unique to you and uses the kubectl-storageos plugin command with a set of basic install parameters that are sufficient for a basic trial installation and to connect the Ondat installation with your portal account for licensing. The installation process may take a few minutes. The end of this guide contains information on verifying the installation and licensing.
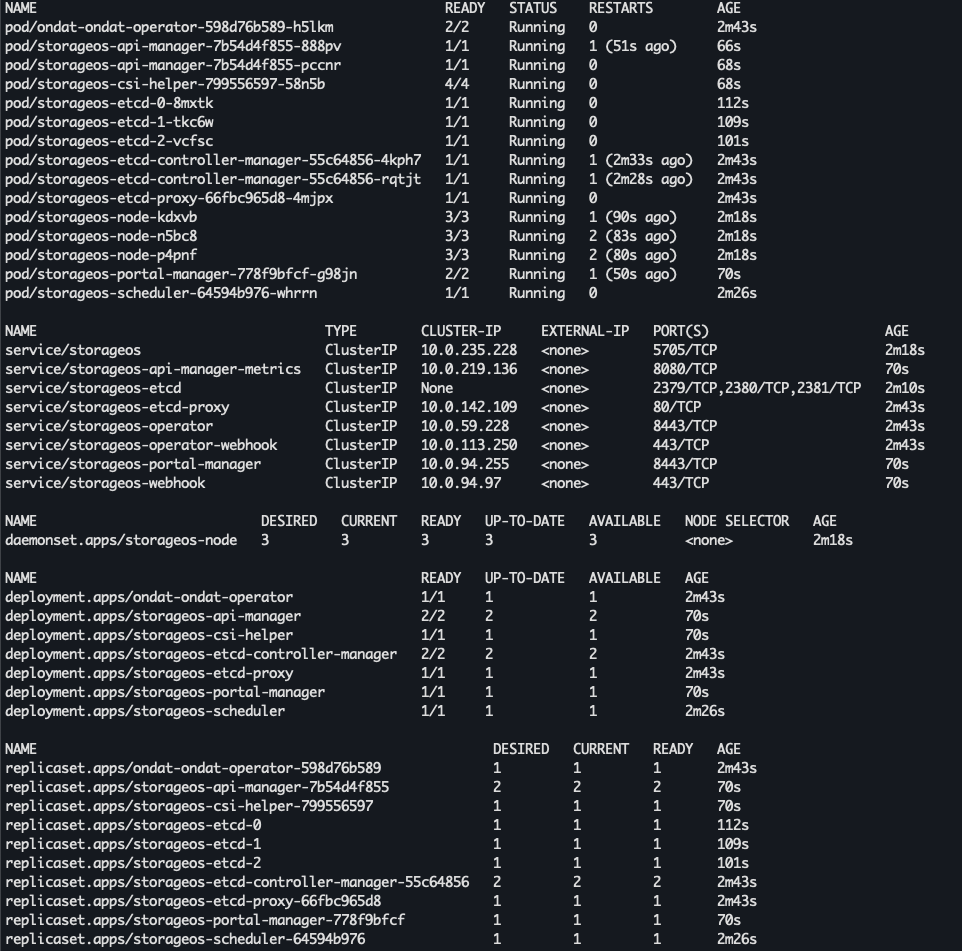
Step 4 - Verifying Ondat Installation
Run the following kubectl commands to inspect Ondat’s resources (the core components should all be in a RUNNING status).
kubectl get all --namespace=storageos
kubectl get all --namespace=storageos-etcd
kubectl get storageclasses | grep "storageos"
Once all the components are up and running the output should look like this:
Step 5 - Applying a Licence to the Cluster
Newly installed Ondat clusters must be licensed within 24 hours. For details of our Community Edition and pricing see our pricing page.
To licence your cluster with the community edition:
- On the Clusters page select ‘View Details’
- Click on ‘Change Licence’
- In the following pop-up select the ‘Community Licence’ option then click ‘Generate’
This process generates a licence and installs it for you. Now you are good to go!