How To Backup & Restore Using Snapshots with Kasten K10
Overview
This guide will walk you through how to use the Ondat Snapshots feature to backup and restore your Kubernetes applications using Kasten K10. Before starting please consult the Snapshots Concepts page for an overview of the feature.
We’ll now run through the steps required to configure and utilise the feature:
- Installing Ondat.
- Installing the Kubernetes snapshot CRDs.
- Configuring the Ondat VolumeSnapshotClass.
- Installing and configuring Kasten K10.
- Backup and restore walkthrough:
- Creating an example application.
- Creating a backup policy.
- Adding pre/post-snapshot hooks to quiesce the application/filesystem.
- Manually running a backup job.
- Restoring an application from a backup.
Prerequisites
To utilize the Ondat Snapshot feature the following prerequisites must be met:
- Ondat v2.8.0 or later is installed in the cluster
- Kasten K10 is installed in the cluster. See the Kasten 10 docs for the full list of prerequisites. Kasten supports Kubernetes versions up to 1.22.
Procedure
Step 1 - Installing Ondat
Ondat Snapshots were introduced in v2.8.0. If you are installing Ondat for the
first time then please follow the instructions
here. If you are upgrading an existing
Ondat deployment then please follow the instructions
here.
Step 2 - Installing the Kubernetes Snapshot CRDs
In order to use the Kubernetes snapshot feature the Kubernetes snapshot CRDs
and the snapshot-controller must be installed. Most distributions don’t
install these by default. To install the VolumeSnapshots,
VolumeSnapshotContents and VolumeSnapshotClasses CRDs run the following:
kubectl create -f https://raw.githubusercontent.com/kubernetes-csi/external-snapshotter/release-6.0/client/config/crd/snapshot.storage.k8s.io_volumesnapshotclasses.yaml
kubectl create -f https://raw.githubusercontent.com/kubernetes-csi/external-snapshotter/release-6.0/client/config/crd/snapshot.storage.k8s.io_volumesnapshotcontents.yaml
kubectl create -f https://raw.githubusercontent.com/kubernetes-csi/external-snapshotter/release-6.0/client/config/crd/snapshot.storage.k8s.io_volumesnapshots.yaml
Now you need to install the snapshot-controller. The
snapshot controller
monitors the Kubernetes API server for VolumeSnapshot and VolumeSnapshotContent
CRDs and forwards the necessary requests to the Ondat CSI plugin. One can install
the controller with the following command:
kubectl apply -f https://raw.githubusercontent.com/kubernetes-csi/external-snapshotter/release-6.0/deploy/kubernetes/snapshot-controller/rbac-snapshot-controller.yaml
kubectl apply -f https://raw.githubusercontent.com/kubernetes-csi/external-snapshotter/release-6.0/deploy/kubernetes/snapshot-controller/setup-snapshot-controller.yaml
Note: it’s important that v6.0 is used for the CRDs and the snapshot-controller.
Other versions may work or may appear to work, but have not been formally tested
and ratified by Ondat.
Step 3 - Configuring the Ondat VolumeSnapshotClass
In order to utilise the Ondat CSI plugin with the Kubernetes snapshot feature, one
must provide a VolumeSnapshotClass for the Ondat CSI plugin. Once the CRDs and the
snapshot-controller have been installed edit your StorageOSCluster to add:
spec:
  snapshots:
    volumeSnapshotClassName: $EXAMPLE_NAME
This will prompt the Ondat operator to create a VolumeSnapshotClass named
$EXAMPLE_NAME and configure it for use with Kasten K10. You can edit your
StorageOSCluster by using the following command:
kubectl -n storageos edit storageosclusters.storageos.com cluster
You can view the VolumeSnapshotClass by running:
kubectl get volumesnapshotclasses
and:
kubectl describe volumesnapshotclasses $EXAMPLE_NAME
You’ll notice the VolumeSnapshotClass contains the k10.kasten.io/is-snapshot-class: true
annotation. This is very important and allows Kasten K10 to utilise the Ondat storage plugin.
Step 4 - Installing Kasten K10
The next step is to install Kasten K10 on your cluster. Instructions for how to do this can be found here.
The remainder of this walk through will assume you have access to the Kasten K10 UI. You
can install it following the instructions
here. Everything we do in the
following steps may be done via kubectl and the command-line, however this is not shown
in this guide.
Once K10 is installed you can then create a “Profile” and configure the backup location. Instructions on how to do this can be found here. It’s also possible to do this via the UI.
Step 5 - Backup and Restore Example
In the following sections, we’ll create a toy application and run through the steps required to back it up and restore from it.
Step 5.1 - Create an Example Application
Start by creating an example deployment in a new namespace ondat-test, which utilises a Ondat PVC:
kubectl create namespace ondat-test
Then apply the following configuration using kubectl create -f:
apiVersion: v1
kind: PersistentVolumeClaim
metadata:
  name: mypvc
  namespace: ondat-test
spec:
  storageClassName: storageos
  accessModes:
    - ReadWriteOnce
  resources:
    requests:
      storage: 2Gi
---
apiVersion: apps/v1
kind: Deployment
metadata:
  name: myapp-deployment
  namespace: ondat-test
spec:
  replicas: 1
  selector:
    matchLabels:
      app: myapp
  template:
    metadata:
      labels:
        app: myapp
    spec:
      containers:
      - name: date
        image: debian:9-slim
        command: ["/bin/sh","-c"]
        args: ["while true; do /bin/date | /usr/bin/tee -a /mnt/date ; /bin/sleep 5; done"]
        volumeMounts:
          - mountPath: /mnt
            name: data-mount
      - name: sidecar
        image: debian:9-slim
        command: ["/bin/sh","-c"]
        args: ["/bin/sleep 3600"]
        securityContext:
          privileged: true
        volumeMounts:
          - mountPath: /mnt
            name: data-mount
      volumes:
      - name: data-mount
        persistentVolumeClaim:
          claimName: mypvc
This deployment creates a pod with 2 containers. The date container will simply append
the date to stdout and /mnt/date every 5 seconds:
kubectl -n ondat-test exec myapp-deployment-7749d9984-r57nk -c date -- cat /mnt/date | head

Tue Jun 28 08:56:07 UTC 2022
Tue Jun 28 08:59:01 UTC 2022
Tue Jun 28 08:59:06 UTC 2022
…
The sidecar container simply mounts in the PVC under /mnt and then lies dormant.
This container will be used during the snapshot process to quiesce the filesystem so
a consistent snapshot can be taken. It serves no other purpose. Notice how this
container must have the privileged flag set to true. This is necessary to run
the fsfreeze command.
Step 5.2 - Add Pre/Post-Snapshot Hooks To Quiesce the Application/Filesystem
In order to take a snapshot of an application we must first quiesce the application and the underlying filesystem.
Quiescing the application means putting it into a paused state where all on-going
operations have completed and no new operations are started. How to do this depends
on what sort of application you are running. For example, a database application may
want to ensure that all in progress transactions are committed and flushed and no
new transactions are started. An application which is buffering data and writing
it to a file may want to ensure that the full write has been completed and the data
has been sync’d.
Quiescing the filesystem is required in addition to quiescing the application and
must always be done when using the Ondat Snapshots feature. This step should be
done after quiescing the application and is achieved by doing an fsfreeze --freeze
on the mounted filesystem. fsfreeze halts access to the filesystem such that any
attempts to issue IO to the filesystem are blocked until the filesystem is unfrozen.
It also ensures that any in progress filesystem operations are completed. This leaves
the filesystem in a consistent state from which it is safe to take a snapshot.
After we are done taking the snapshot, we can run fsfreeze --unfreeze to unfreeze
the filesystem. If required, any steps to quiesce the application can then be performed.
To execute these “pre-snapshot” and “post-snapshot” operations one can use a Kanister blueprint in conjunction with K10’s execution hooks feature. Kanister is an open source framework which allows users to automate application specific management tasks via yaml based configuration. Kasten K10 can leverage these blueprints to perform various actions pre and post-snapshot.
We’ll use the following blueprint to quiesce the filesystem before taking a snapshot and unquiesce it after taking the snapshot.
We don’t perform any application level quiescing here as it’s not required for our toy application.
For statefulsets the blueprint below can be used as a baseline, but change
kindtoStatefulSet,Deployment.NamespacetoStatefulSet.NamespaceandDeployment.PodstoStatefulSet.Pods.
apiVersion: cr.kanister.io/v1alpha1
kind: Blueprint
metadata:
  name: fsfreeze-hooks-deployment
  namespace: kasten-io
actions:
  backupPrehook:
    kind: Deployment # or StatefulSet
    phases:
    - func: KubeExec
      name: fsfreeze
      args:
        namespace: "{{ .Deployment.Namespace }}"  # or StatefulSet.Namespace
        pod: "{{ index .Deployment.Pods 0 }}"     # or StatefulSet.Pods
        container: sidecar
        command:
        - bash
        - -o
        - errexit
        - -o
        - pipefail
        - -o
        - xtrace
        - -c
        - |
                    fsfreeze --freeze /mnt
  backupPosthook:
    kind: Deployment
    phases:
    - func: KubeExec
      name: fsunfreeze
      args:
        namespace: "{{ .Deployment.Namespace }}"  # or StatefulSet.Namespace
        pod: "{{ index .Deployment.Pods 0 }}"     # or StatefulSet.Pods
        container: sidecar
        command:
        - bash
        - -o
        - errexit
        - -o
        - pipefail
        - -o
        - xtrace
        - -c
        - |
                    fsfreeze --unfreeze /mnt
If you have installed kasten into a namespace other than
kasten-iothen you’ll have to modify thenamespacefield in the above configuration.
Apply the blueprint with the kubect create -f command. One can observe the
blueprint like so:
kubectl -n kasten-io get blueprints.cr.kanister.io

NAME                                              AGE
fsfreeze-hooks-deployment                         15h
k10-deployment-generic-volume-2.0.20              3h2m
k10-persistentvolumeclaim-generic-volume-2.0.20   3h19m
We must now annotate our deployment so that the aforementioned hooks are used at snapshot time:
kubectl annotate deployment -n ondat-test myapp-deployment kanister.kasten.io/blueprint='fsfreeze-hooks-deployment'
Step 5.3 - Setting Up a Backup Policy
Ensure you have the Kasten K10 dashboard installed
(see here). It’s possible
to do the steps in this section via kubectl and the command-line. Please see the
Kasten K10 documentation for how to do this.
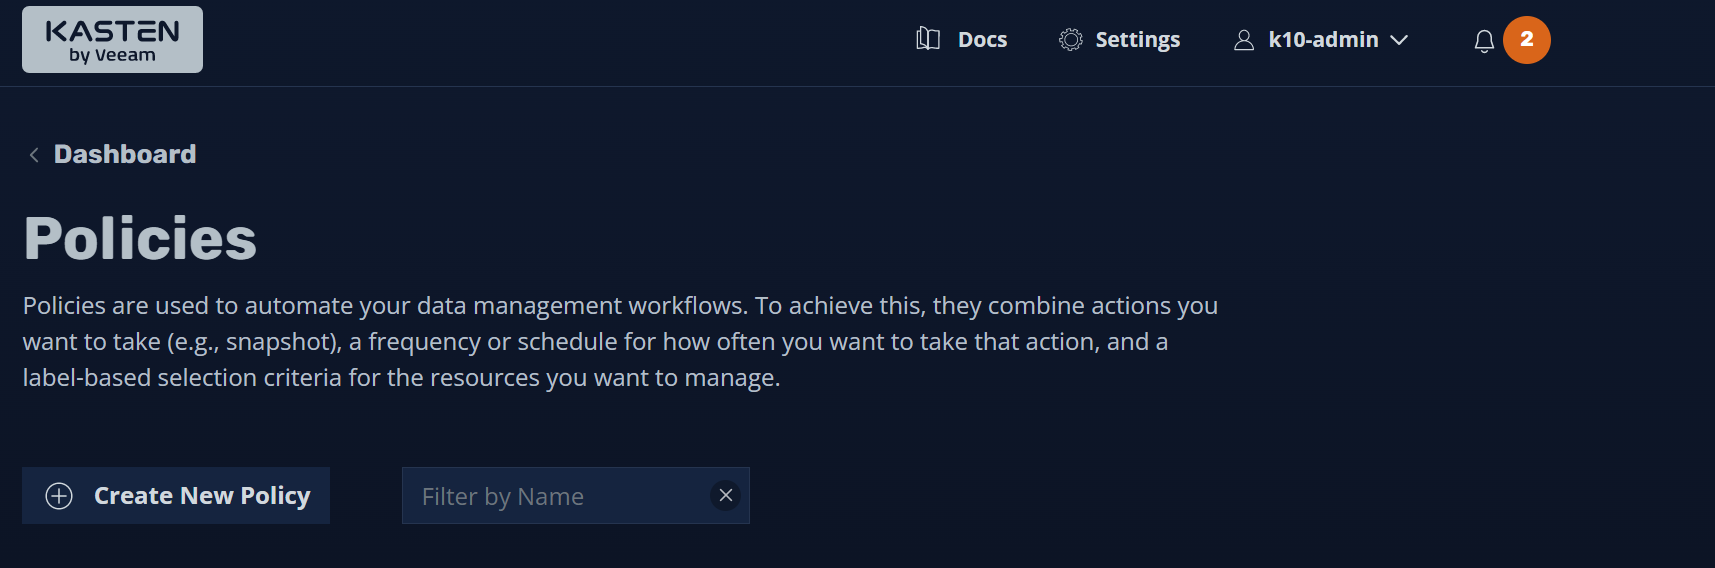
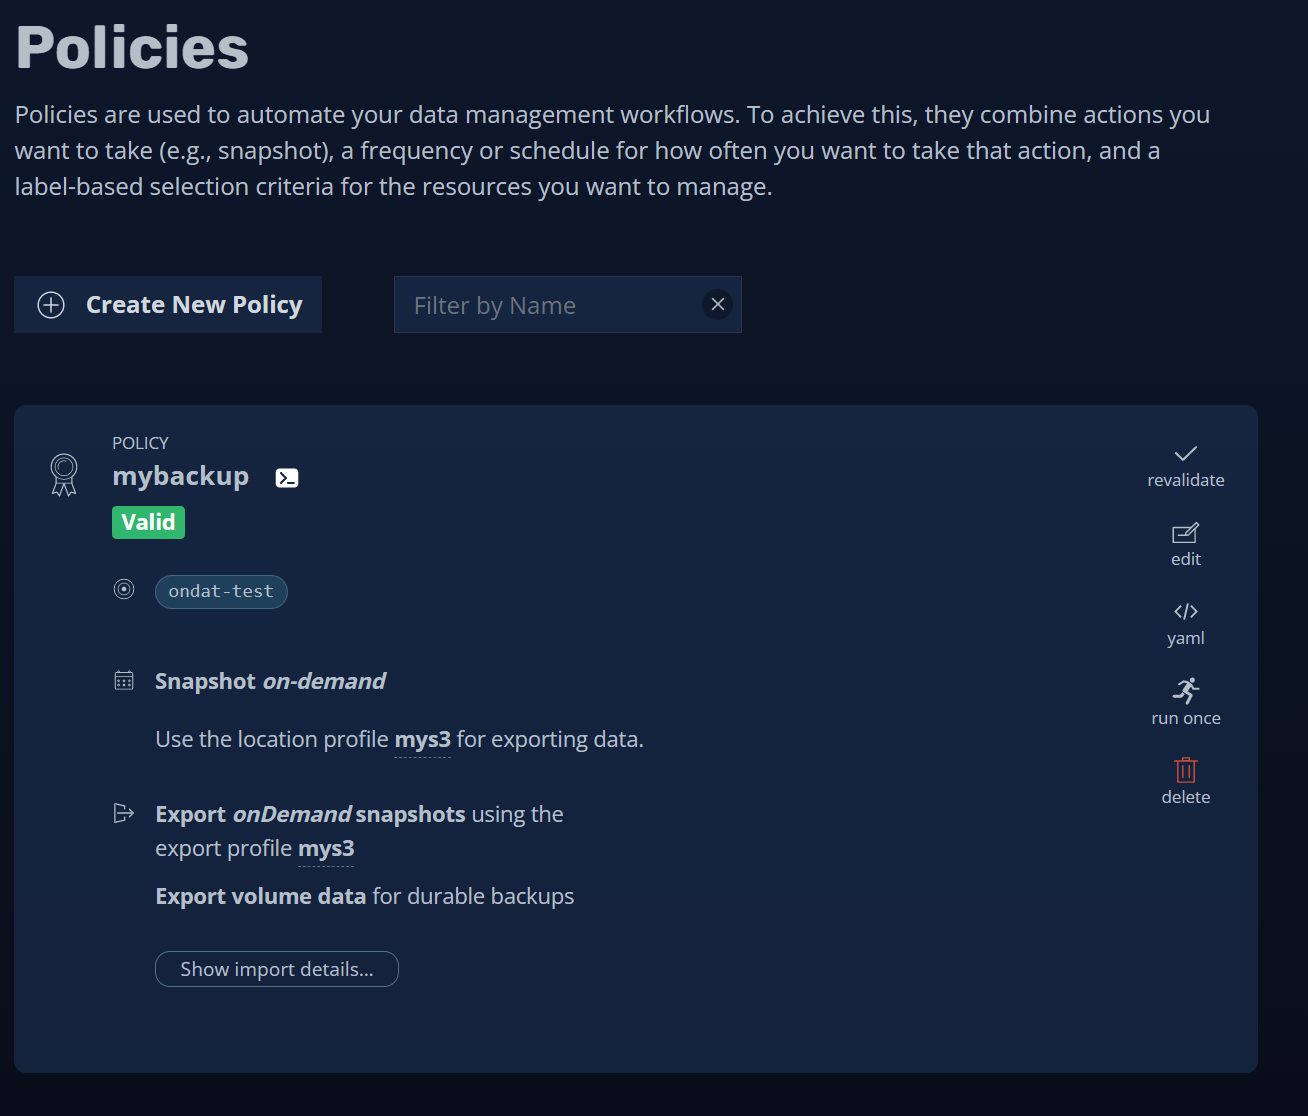
Go to the “Policies” page and click “Create New Policy”:
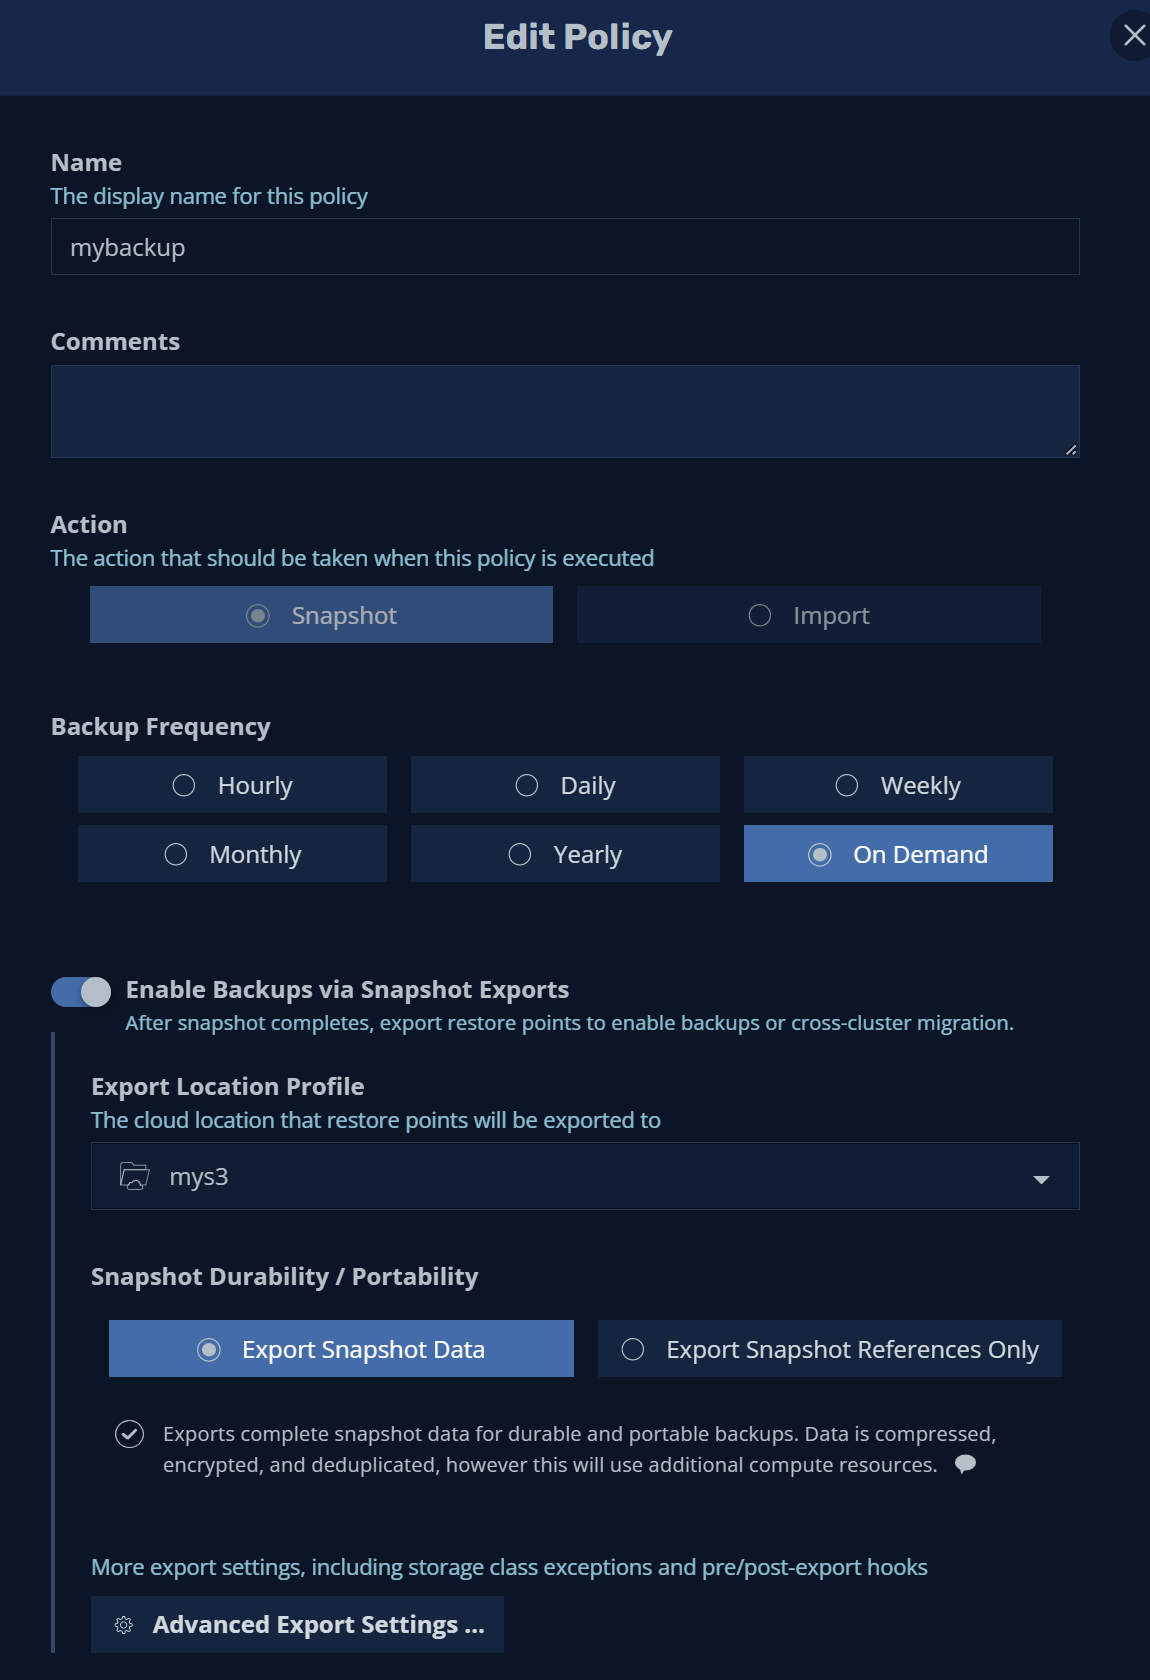
Input a “Name” for the policy and set the “Backup Frequency” to “On Demand”.
Check the “Enable Backups via Snapshot Exports” field. This is very important. The Ondat Snapshots feature only supports restoring from an external snapshot export. Set the “Export Location Profile” to the profile you previously set up in the “Installing Kasten K10” section.
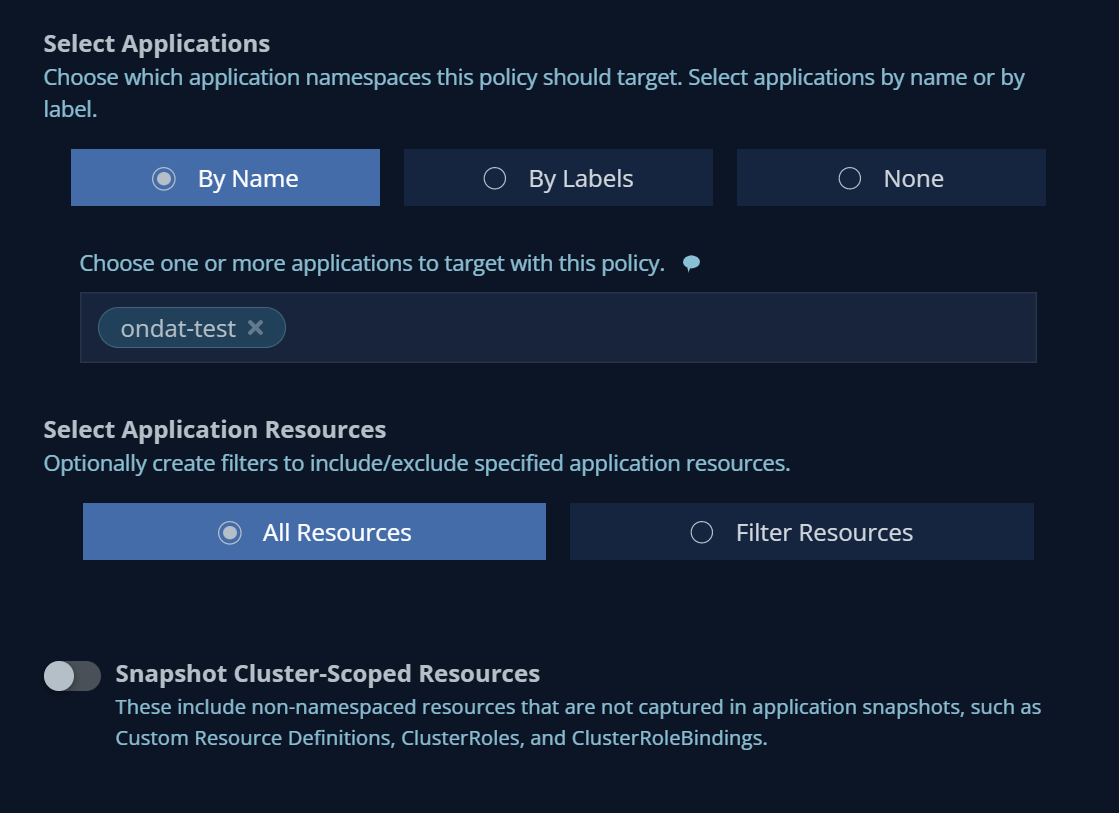
Under “Select Applications”, check the “By Name” checkbox and search for the namespace “ondat-test”.
Leave everything else as is then click Create Policy to create the policy.
⚠️ Do not try to set the
Pre and Post-Snapshot Action Hooksin theAdvanced Settingssection. This is taken care of by the steps in “Adding pre/post-snapshot hooks”.
Step 5.4 - Manually Running a Backup Job
We can now manually run a job to backup our application. Browse to the dashboard homepage and select “Policies”. From there we can find our policy and initiate a backup by clicking “run once”:
If we navigate back to the dashboard we’ll see that our policy is running:

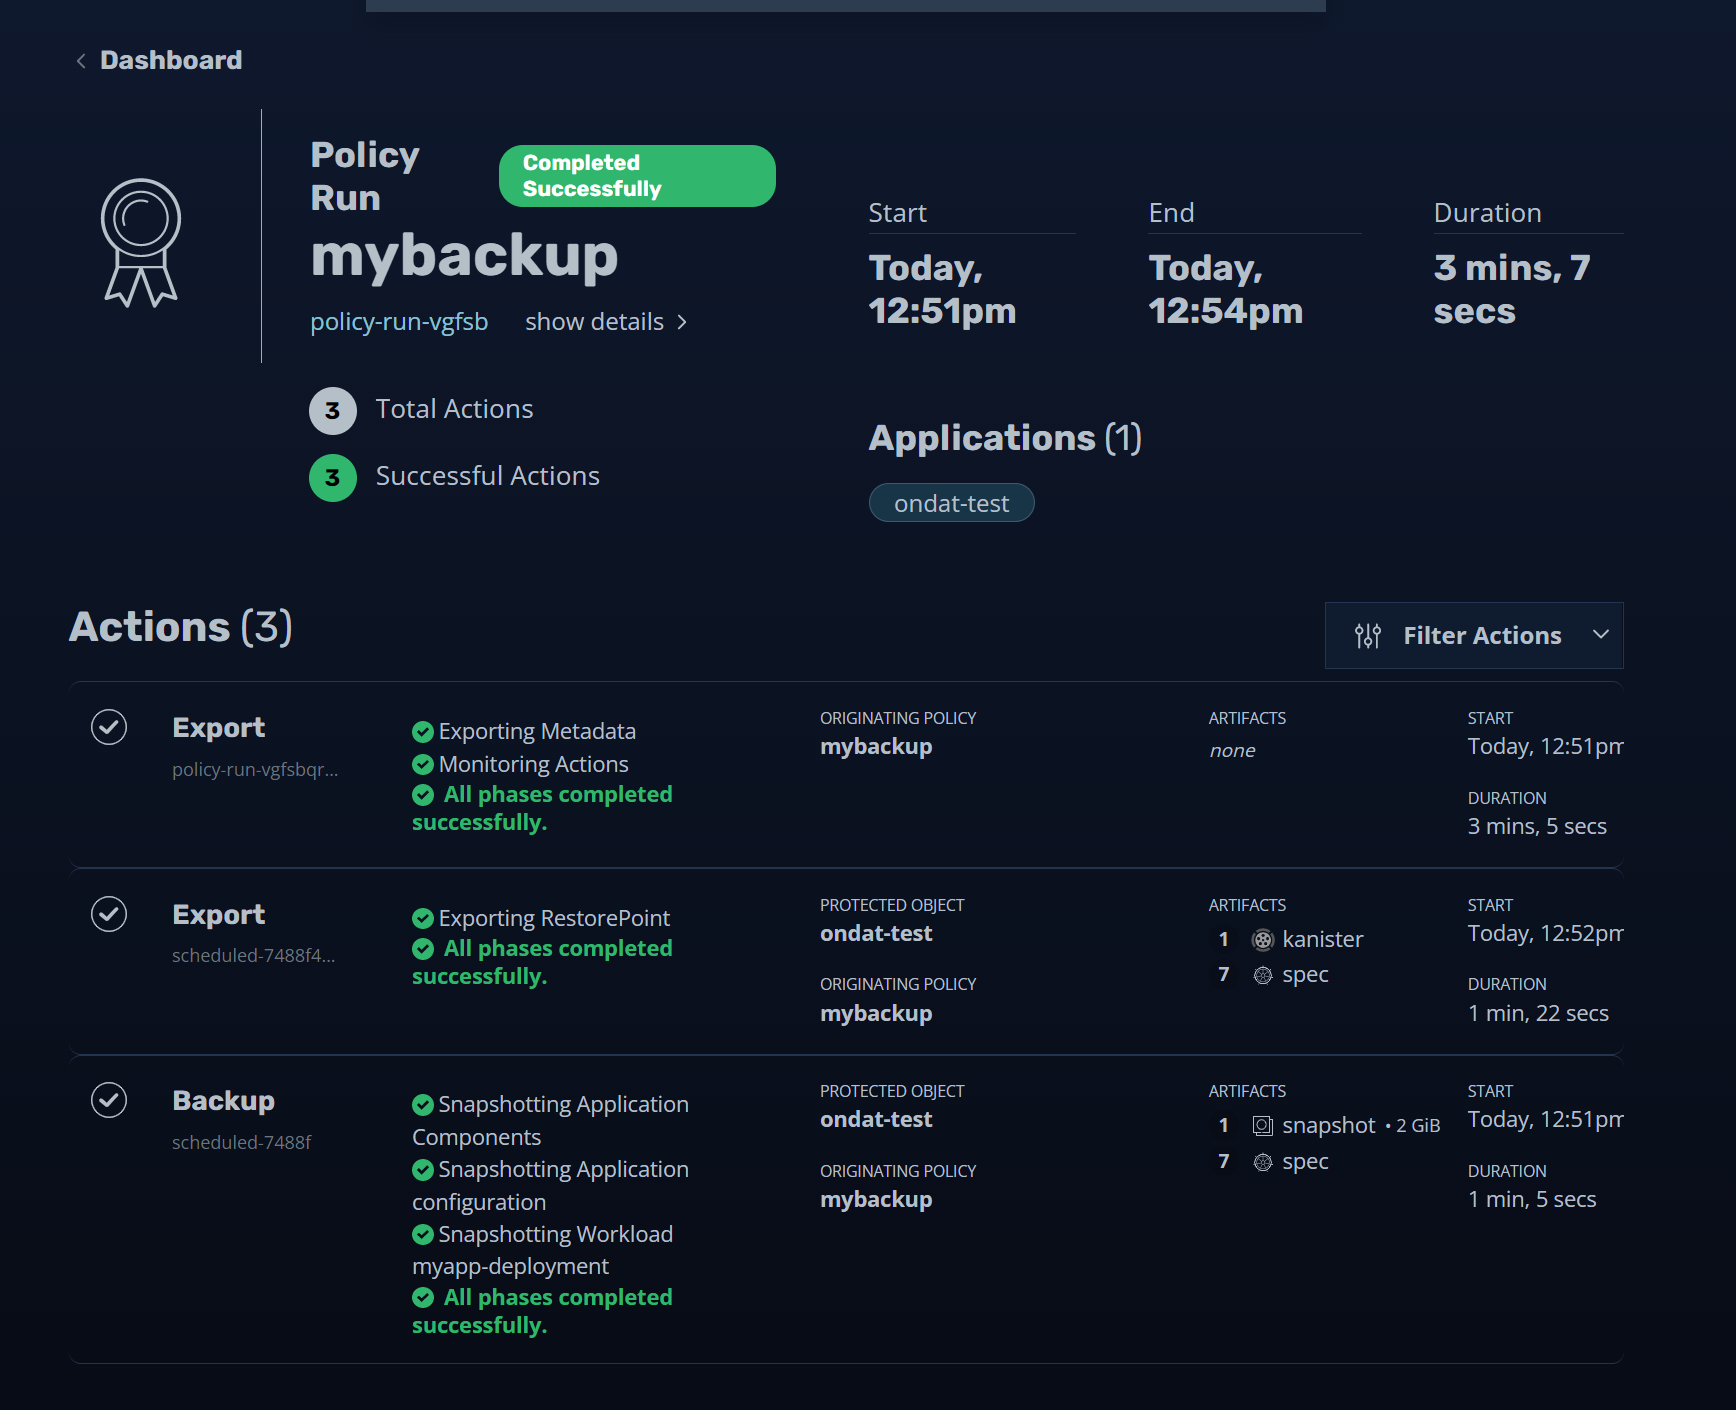
We can get further information on what is happening by clicking our policy in the “Actions” section. When the policy has successfully ran we’ll see a page like this:

In order to save space and reduce copy-on-write latency on the parent volume
we should now manually delete the VolumeSnapshot object associated with our
snapshot. This instructs Ondat that we are done with the snapshot.
kubectl get volumesnapshots -n ondat-test

NAME                            READYTOUSE   SOURCEPVC   SOURCESNAPSHOTCONTENT   RESTORESIZE   SNAPSHOTCLASS             SNAPSHOTCONTENT                                    CREATIONTIME   AGE
k10-csi-snap-wlxhw8vf9dx4qtq2   true         mypvc                               2Gi           csi-storageos-snapclass   snapcontent-359f9126-f428-4dbf-82da-932a74d10e83   40m            40m

kubectl delete volumesnapshots -n ondat-test k10-csi-snap-wlxhw8vf9dx4qtq2

volumesnapshot.snapshot.storage.k8s.io "k10-csi-snap-wlxhw8vf9dx4qtq2" deleted
Step 5.5 - Restoring an Application From a Backup
Let’s emulate a disaster recovery scenario, by deleting our deployment:
kubectl delete -n ondat-test deployments.apps myapp-deployment
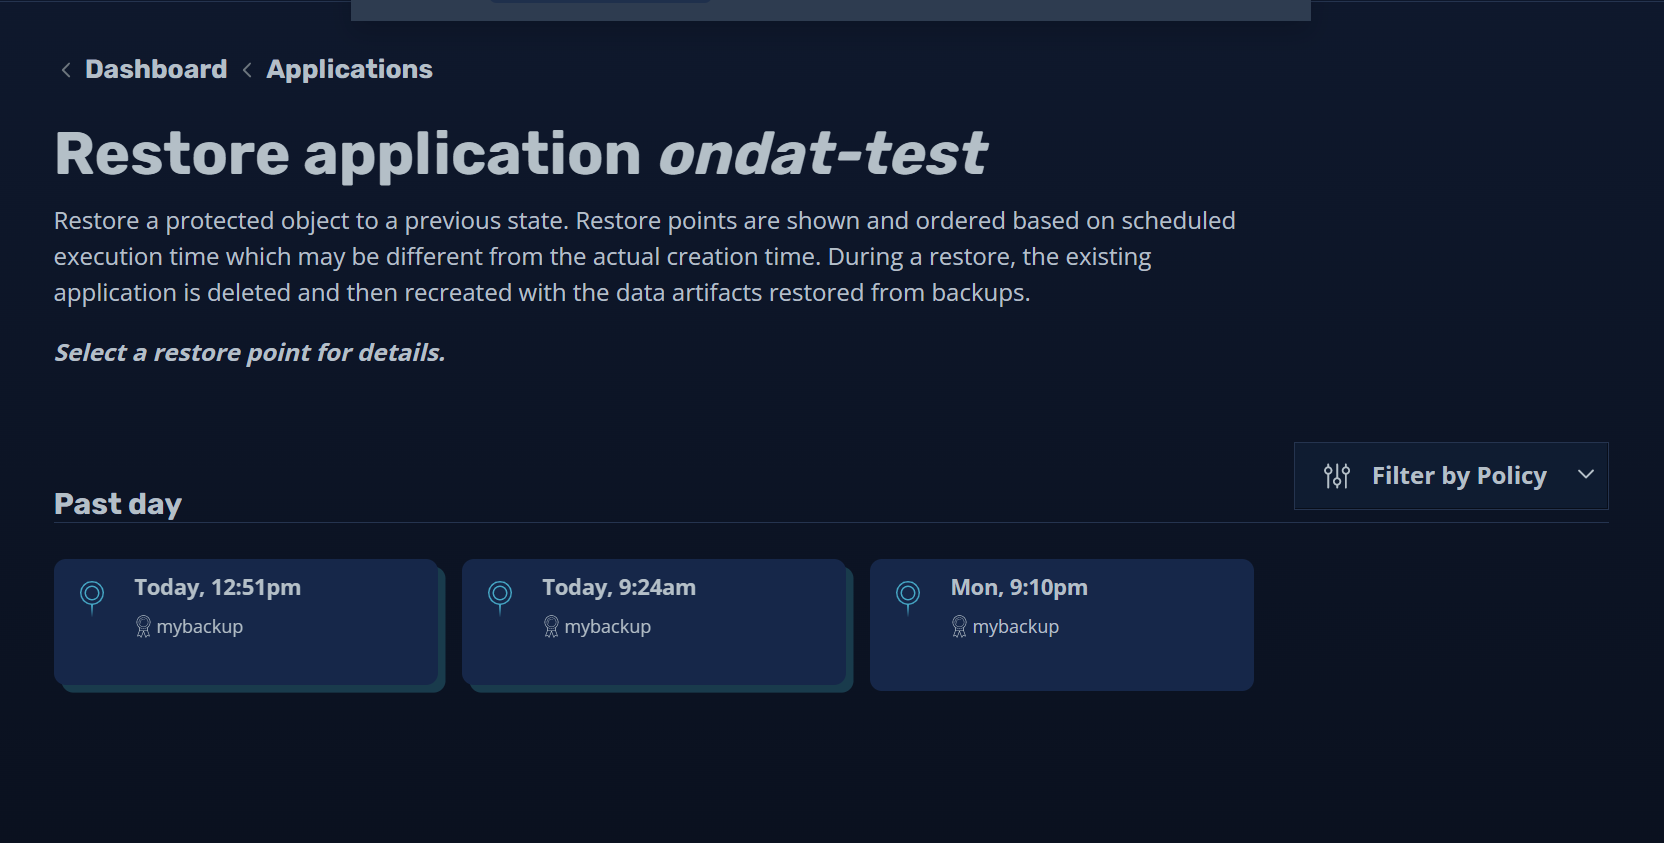
Now let’s restore it. First go to the dashboard and select “Applications”. From there find “ondat-test” and select “restore”:
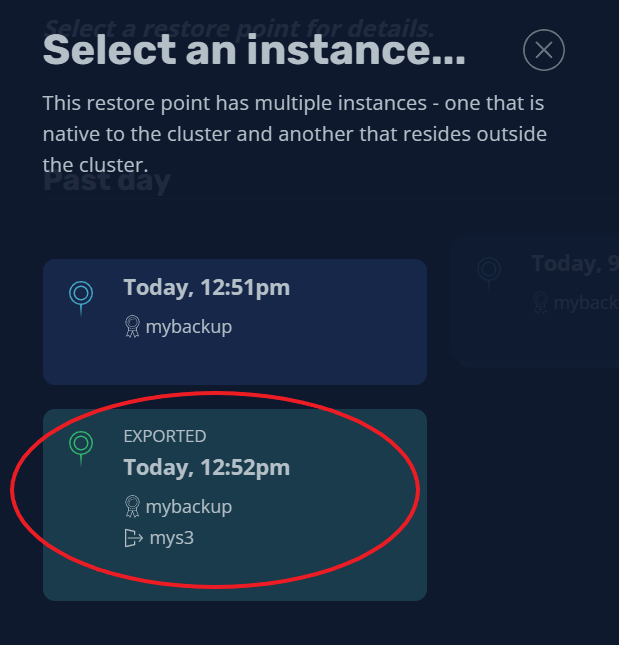
Select the backup you wish to restore from, in this example we’ll select “Today, 12:51 pm”. When prompted to select an instance make sure you select the “EXPORTED” instance which has been backed up to S3. The Ondat Snapshots feature does not support restoring from a local backup:
Kasten provides various restore options at this point, but we’ll just leave everything else defaulted. See the Kasten K10 documentation for more information. Click “Restore” to start the restore process and to restore the application from the backup.
One can now browse back to the dashboard and watch the “Restore” operation progress. Like before, one can click on the drill down into the operation by clicking the relevant restore pane under the “Actions” sections.
Once the restore job has finished you’ll see a screen like this:
Let’s check our application is running:
kubectl get -n ondat-test deployments.apps myapp-deployment

NAME               READY   UP-TO-DATE   AVAILABLE   AGE
myapp-deployment   1/1     1            1           10m
And let’s view the contents of the “/mnt/date” in the application’s pod:
kubectl -n ondat-test exec myapp-deployment-7749d9984-p7jzp -c date --  cat /mnt/date

Tue Jun 28 08:56:07 UTC 2022
Tue Jun 28 08:59:01 UTC 2022
…
Tue Jun 28 11:50:40 UTC 2022
Tue Jun 28 11:50:45 UTC 2022
Tue Jun 28 11:58:33 UTC 2022
Tue Jun 28 11:58:38 UTC 2022
…
Tue Jun 28 12:10:29 UTC 2022
Tue Jun 28 12:10:34 UTC 2022
Notice how there’s an 8 minute gap between 11:50:45 and 11:58:33. This coincides with the snapshot being taken at circa 11:51 (UTC) and being restored at 11:58 (UTC).
Known Issues & Gotchas
Deletion of VolumeSnapshot
Ideally the Kubernetes VolumeSnapshot object should be deleted as soon as the
application has been backed up externally. There’s no reason to keep the snapshot
as it can’t be meaningfully used. Furthermore, it takes up space on the local node
and can cause a slight performance degradation for IO to the parent volume. At the
moment, there is no good way to automate this procedure. Consequently users should:
set their snapshot retention policy to 1 hourly snapshot when setting up a backup
policy. This does not fix the issue, but ensures that the snapshot is removed within
an hour of been taken. It is also possible to remove the snapshot manually by
running kubectl delete volumesnapshots -n <app_namespace> <snapshot>.
Performance Implications
The Ondat snapshots feature utilises copy-on-write semantics under the hood. This
means while a VolumeSnapshot object exists any blocks which are written to the
parent volume invoke an extra read and write operation as blocks are copied into
the snapshot object. The performance decrease incurred by this overhead is dependent
on: the size of the volume, the speed of the underlying storage, the amount of
data in the page cache and a myriad of other factors. Once the snapshot(s)
associated with a volume are deleted, performance will return to baseline.