MicroK8s
Overview
This guide will demonstrate how to install Ondat onto a MicroK8s cluster using the Ondat MicroK8S add-on.
Prerequisites
1 - Cluster and Node Prerequisites
The minimum cluster requirements for a non-production installation of Ondat are as follows:
- MicroK8s v1.26 or greater to deploy the Ondat add-on.
- Linux with a 64-bit architecture.
- 2 vCPU and 4 GB of RAM per node.
- 3 worker nodes in the cluster and sufficient Role-Based Access Control (RBAC) permissions to deploy and manage applications in the cluster.
- Ensure that your MicroK8s cluster is using an Ubuntu LTS release image as the default node operating system and supports
snapd. The Ubuntu LTS release image has the required kernel modules available for Ondat to run successfully.
For a comprehensive list of prerequisites and how to build a production installation of Ondat refer to Ondat Prerequisites.
2 - Client Tools Prerequisites
The following CLI utilities are installed and available in your $PATH on the machine where you will be running the installation commands:
Installation of Ondat
Step 1 - Enable The MicroK8s Add-ons Community Repository
First, ensure that you have enabled the Community repository by running the following command:
microk8s enable community
Step 2 - Install The MicroK8s Ondat Add-on
To enable the add-on, run the following command:
microk8s enable ondat
- For Ondat to be successfully deployed onto a MicroK8s cluster, the following Core add-ons should be available:
dns- CoreDNS to provide address resolution services and service discovery in your MicroK8s cluster.hostpath-storage- Host storage for Ondat’setcdcluster.helm3- Helm 3 package manager for Kubernetes to deploy the Ondat Helm chart.
💡 The Ondat add-on will automatically check and deploy the required core add-ons if they are not already installed in the MicroK8s cluster.
Step 3 - Verifying Ondat Installation
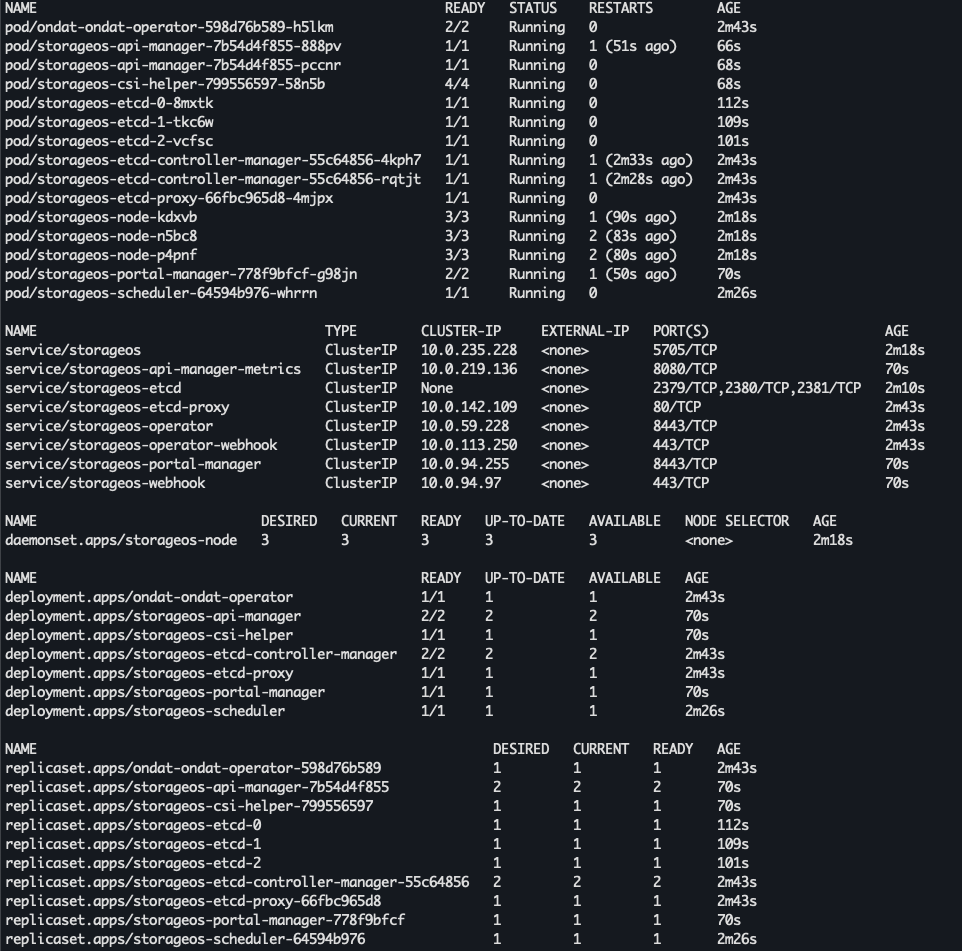
Run the following microk8s kubectl commands to inspect Ondat’s resources (the core components should all be in a RUNNING status)
microk8s kubectl get all --namespace=storageos
microk8s kubectl get storageclasses | grep "storageos"
Once all the components are up and running, the output should look like this:
Step 5 - Applying a Licence to the Cluster
Once you have confirmed that your deployment was successful, the next step will be to get your free Community edition licence by signing up and registering your cluster through the Ondat Portal.
💡 Newly installed Ondat clusters must be licensed within 24 hours.
To register your cluster:
- Either login or create an account on the Ondat Portal.
- Choose the “Install Ondat on your cluster” or “Add cluster” options in the UI.
- Add a Name for your cluster and where it is going to be located. This will allow you to view the same prerequisites listed above.
- After selecting “Next”, you will be provided with 2 options, namely “New Installation” and “Existing Installation”.
- Select the “Existing Installation” option, then copy and paste the Helm commands into your terminal and run them against your MicroK8s cluster, which already has an existing Ondat installation.
To licence your cluster with the Community edition:
- On the Clusters page, select “View Details”.
- Click on “Change Licence”.
- In the following pop-up select the “Community Licence” option then click “Generate”.
This process generates a licence and installs it for you. Now you are good to go!